Tuesday, October 28, 2014

tangy black & garbanzo bean hummus

I've always somewhat enjoyed hummus, but never enough to have it on hand in my fridge at all times.  When I decided to try a vegan diet, hummus was the first food I turned to.  I knew that it was a great source of protein and it was delicious.  My first attempt at making hummus was from this recipe.  It was very delicious and I made it quite a bit.  I then moved onto a recipe with roasted red peppers in it and didn't like it very much.  Growing tired of the same flavor, I ventured on my own and created this recipe.  The first try came out kind of runny at first but firmed up after a bit. Even then, it doesn't have quite the same consistency as store bought hummus, but is just as delicious.  I added 2 tbs of water before I really checked the consistency, so I might try only adding 1 or none at all next time, depending on what I'm using it for.  When it was first out of the blender and runny, I put it on some lettuce as a dressing and it was delicious!  I was really happy with how it turned out.  A little spice and lingering heat, mixed with tangy lemon juice and nutty tahini.  I like to use dried beans for less sodium, but you can use canned beans as well- the conversion isn't exact- so if you are using canned beans, your hummus might come out a little thicker and require more water to get the right consistency.  Look below for my guide to using dried beans.


 tangy black & garbanzo bean hummus

1/3 C lemon juice
1/3 C tahini
2 cloves minced garlic
1 tsp cumin
2 tsp sriracha
1 tsp salt
3 tbs olive oil
1 C black beans or 1 can drained (1/3 cup dried)
1 C garbanzo beans or 1 can drained (1/3 cup dried)
1-2 tbs water


tangy black & garbanzo bean hummus

Put lemon juice and tahini in a blender or food processor.  Make sure to stir your tahini really well before adding.  Process together until mixed well.  Add garlic, cumin, sriracha, salt and olive oil; process until mixed well.  I scrape the sides and bottom at this point and add half of the beans.  Process until well mixed.  Add the second half of the beans and process until smooth. Scrape the sides and bottom and add 1 tbs of water at a time until extra smooth and creamy.  The black beans will leave little black flecks in the hummus so if you want hummus that looks store bought you could use 2 cups of garbanzo beans instead.


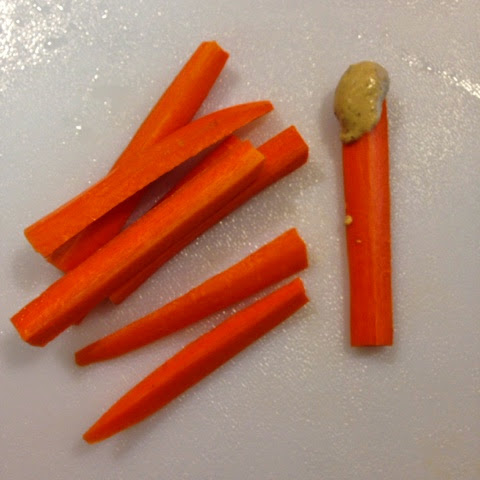
hummus is a perfect dip for your favorite veggies

I love toasted pita or veggies for dipping, but even better is replacing your dressings and condiments with hummus.  We use it as a mayo replacements for sandwiches, creamy salad dressing, or tossed with hot pasta.

I hope you try it and you like it!  I would love to hear your comments on what you tried, and if you liked it or what you would change!  

Tip for using dried beans:

I don't know why I don't make this recipe with canned beans.  It is easier and A LOT less time consuming, that is for sure.  I think I am a completionist (imagine that is a word) in that if I am making home made hummus from scratch it needs to be 100% from scratch.  I could claim it is cheaper and that there is less sodium, so I think I will.   
For conversions, keep this in mind: 1 can of beans is approximately 1 cup once drained, and 1/3 cup dried beans is approximately 1 cup cooked beans.   I like to measure out my beans the night before I am going to use them.  There are methods mentioned all over the internet that don't involve soaking, but this is the first method I used and am too lazy to try any other methods.  I measure the beans and put them in at least triple the volume of water to soak in the fridge over night. (Most will take over 8 hours to soak, so this is the preferred method for me)  I cook them the next day by boiling them for about an hour.  Some beans take more time than others.  I boiled the black and garbanzo beans together for only 45 minutes, and they turned out just fine.  Just keep an eye on the pot so it doesn't 
overflow or get too low on water.  You will want plenty of water to boil the beans in.  To check if they are done, the beans should squish very easily.  How is that for exact?  I have read a bunch of guides on how long to soak and how long to cook and with how much water.  I  have never followed them exactly but gotten the results I needed, so see what works for you.  


Tuesday, October 21, 2014

chili verde

My mom's Chicken Chili Verde has been a family classic and favorite for a long time.  It was one of the first recipes I requested as a newly-wed, and served often.
  As I have been struggling through my new found veganism this was a meal I turned to for ease and comfort.  I decided to try it as is just without the chicken and found it was lacking texture and sustenance.  Basically a glorified liquid salsa.  I improvised by adding quinoa and some things I had on hand.   Next time I will probably chop up some green peppers  to add to the mix.    


chili verde

3 cloves garlic minced
1 small onion chopped
3 C green salsa
1/2 tsp cumin
1/2 tsp coriander
3 10oz cans green enchilada sauce
2 corn tortilla broken up
1/2 C uncooked quinoa
avacado
fresh cilantro

Saute onion and garlic in a fry pan and place in crock pot with green salsa, cumin, coriander, enchilada sauce, cilantro and 2 corn tortillas.   I was in a time crunch and didn't have time to let the quinoa cook in the crock pot so I cooked it for about 10 minutes and then strained it and put it in the pot with the rest of the ingredients.  I will try a more convenient way next time I make it and update this post.    Since nothing has to cook through you can leave it in there for as little or as long as you need.  The flavors taste better if you give them time to marry, I would say at least 4-6 hours on low.  
Serve over rice and corn tortillas or with tortilla chips, adding the avacado and remaining cilantro on top.    

Monday, October 20, 2014

whole wheat vegan bread

I am so beginner at bread I can't even tell you.  I can count on one hand how many loaves of bread I have made, all of which have been in a cheater bread machine.  That being said, two of the loaves have been recipes of my own tweaking so I will take a bit of credit.   One day, I am going to make bread from scratch with my own two hands, just so I can appreciate the process.  Until then, I will gladly appreciate my amazing bread machine.


This bread loaf comes to you from a need for something heavy and dense.  I had tried the plain white bread from the bread machine manual, and also a garlic cheese bread of my own creation.  Both were good, but they were not fulfilling nutritionally.    This bread went along with some very yummy minestrone soup.  We put real butter on it today, but one day, when I am feeling ambitious, and have more than a small handful of cashews on hand,  I think I would like to try it with cashew butter.  I modified this bread just slightly from a recipe I found on the web at Guilty Kitchen


whole wheat vegan bread

1 C original, unsweetened almond milk
2/3 C water
2 Tbs Olive Oil
2 Tbs amber coconut nectar
2 tsp salt
3 3/4 C wheat flour
3/4 C mix of chia seeds, raw sunflower seeds, flax meal
2 1/4 tsp active dry yeast
2 Tbs vital wheat gluten

I put it all in the bread pan in the order mentioned and ran it on the whole wheat cycle with medium crust.  It came out PERFECT.  I would let it cool for at least 30 minutes or be careful when cutting into it.